Friday 3 May 2024

A harvest apron gift

 I have not made an adult gift for quite a while but had come across a suggestion that I knew would be a perfect gift for someone who has an allotment. 

The harvest apron is a double apron with a larger front pocket that can be adjusted to hold allotment harvest without having to carry a basket. 

I did some research & some of the suggestions are rather large which wouldn't suit someone who is petite so I made my own notes & did adjustments. You tube has several videos that suggested the apron could be made quite quickly.  I was much slower than that because I was working out the process. 

I used earthy colours because it will be used on an allotment. The contrasting fabric is perfect to add some interest & it was the same fabric weight. 

You need fabric for the main body (2 pieces or one folded double) 

A waistband, two ties, a loop, ties for the apron part (I used a soft ribbon)

I pressed as I went along because I wanted a neat finish. 

* press over the fold over / harvest part of the apron, fold again & press again. Find the centre point & make a button hole over the fold. This is where the tie will come through.

* sew the two side seams of the apron, leaving about 1.5 inches at the top for the waistband part to be attached 

* trim the side seams with a pinking shears then encase the seam as a french seam. Press 

* make up the two straps on the waist band - right sides together, sew, trim,  pull it through then press & top stich all around the ties. 

* make up the centre tie that will attach to the waistband & hold the ties from the front apron, press all

*gather the top of the back apron to the waistband size (this one was 25 inches for a petite person). I only did a single row of thread for the apron gathering  & that worked fine. 

* The apron top is sewn then encased in the waistband which was quite fiddly to make sure the apron, ties & loop were all lined up to be encased in the waistband. 

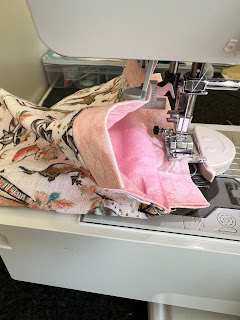
Of course, the bobbin thread ran out before the last top stitching line so I had to redo the bobbin. This Brother machine has a top drop in bobbin so you can see the amount of bobbin thread which is useful .

After much pressing & stitching, it was a final press & snipping of loose threads - then ready to be packaged as a gift. 


I like the earthy colours of the fabric & because the apron seams are double sewn as a French seam, it will be hardy enough for regular use & to carry produce on the allotment. 

I hope it will be well received & well used. Perhaps I will make another to improve the process & smooth out the little snags I had to unpick. 

This would be well received as a gift for a keen gardener too, or for someone with hens & they need to collect eggs etc. 


Pressed & folded in to a fabric bag that can be reused for seeds etc. 

I hope I have inspired some to have a go at something else.  Thank you for stopping by, commenting & sharing the blog. 

Dee ๐Ÿชก๐Ÿ“๐Ÿงต

Thursday 2 May 2024

Little pancakes with apple

 I do love a quick pancake & sometimes, it is a spur of the moment thing. 

Today was such a day - with fruit to use up in the fridge & a slower morning, I quickly cut fruit & made up the pancake mixture. This is the recipe my late mother always made - I have shared it before but here it is again. 

I always just mix with a whisk & a bowl 

1 cup of self raising flour 

1 egg 

5/8th cup of milk (about 150-175ml) 

a little vanilla extract if liked 

Whisk together, adding a little milk to the mixture if it is too thick. 

Heat the pan & turn it down to medium. Drop tablespoons of the mixture on to the pan & wait until it bubbles then flip over - it is less than 1 minute each side. 

For the apple ones, I cut half an apple in to thin pieces (skin on still) and then as the first side of the pancake was cooking, I added the apple pieces to the pancake, let the bottom side cook then flipped it over. Watch that the apple does not brown too much (turn the heat down if needed) 

Serve the pancakes with fruit,  yoghurt or anything you fancy. 

They really do take less than 5 minutes to mix & a few minutes to make. This mixture makes about 9 (of the size shown in the photos) and the mixture can be doubled. 

Best served hot with orange juice or a tea or coffee. 

Do tell if you make them & what you put with yours.


Thank you for stopping by, 

Dee ๐Ÿฅž

Saturday 20 April 2024

Growing ginger & other things at home ...

 I freely admit to being  a serial grower; there is always a pot of something growing on a sunny windowsill. It is often the base / crown of celery which easily spouts in shallow water then can be grown on in the covered Elho planters against the house. 

The planters already have some potted tomato plants being grown up & hardened off to be planted out mid May once it warms up & the risk of frost has gone. 


There is also some sunflower seeds growing on to be potted up - the birds peck them if they are grown outdoors initially. 

I have had little success with growing ginger; however, I saw a suggestion some months back online that advocated putting the root in damp kitchen paper in a plastic bag in a dark space & leaving it until it grew eyes. I duly did this with a root bought alongside my shopping. I cut it in to several pieces, wrapped each loosely in kitchen roll, dampened it & popped them in a sandwich bag. This went in the bottom pot drawer in the kitchen,  balancing on a sieve. 

I admit to almost forgetting about it, then noticing that the paper towel had purple colouring (from the roots) and other than checking it was still damp (it was) I just left it. I put an avocado pip in another bag with paper towel & left that too. 

I had a look this past week & the ginger had well developed eyes & some roots too so I have potted them on in a container. The suggested method is not to bury them but to lay them on the surface of the soil. Because it is still cold,  I spiked two sticks in the pot & wrapped bubble wrap around the pot, poking the bubble wrap on to the stick tops to form a little hot house. 

I am hopeful that this batch might actually grow but it is early days yet. Any suggestions to successfully growing it? 

The avocado pip was checked & it has a root growing. In Southern Africa we grew them as houseplants by starting them off with match sticks stuck in them but I have not had much luck so will give this one a bit longer on the sunny window sill before potting it on. 

I also have a lemon grass rooting in a glass on the windowsill - that will be ready for potting on this week & again in a warm bubble for a while as it grows on. 

I love the challenge of growing things; I hope you do too. 

Thank you for your company, please stop in again soon, 

Dee ๐Ÿซš๐Ÿซ›๐Ÿชด๐ŸŒฑ

Friday 19 April 2024

A little drawstring bag for a baby gift

Little ones need little bags to keep their little toys & teething bits in where it is more hygienic. 

I made a little Beatrix Potter bag last year & it was well received for carrying around teething shapes to keep them away from the general things in a handbag. 

With a bit of free time today I decided to do another bag for a gift. I rather liked the animal fabric as all children seem to get on with animals & patterns that are not too busy. I picked out a plain pink lining fabric & a lightly patterned pink fabric for the drawstring additions.  

This one has turned out taller which might not be a bad thing. The animal fabric is pretty & I thought with a pink lining it would be well received by someone with an interest in animals.  I love these gentle shades of fabric that I use for the drawstrings. 

Because it has been some months since I made the last one, I did have a moment when it went wrong & the unpicker had to come out to take out a seam. However, that happens to all of us at times so it is just one of those things when you do it off the top of your head. 

I might make a few more as I know of several new babies who need one too, perhaps best while the  process is still clear in my mind. 

Do you have any creative projects on the go? Tell all ... 

Thank you for stopping by & taking the time to visit, 

Dee ๐Ÿงต๐Ÿชก๐Ÿ“๐Ÿ‘ถ

Sunday 14 April 2024

Free motion embroidery circular nest alternative


I love having free time & this morning, a lazy Sunday, I had written up my previous circular stitching woollen nest for April, I had a niggly thought of a different way to do it in my head. Why not try out the alternative even though the first one is done & edged? 

This is a circular stitching project & other than some couching of the 'nest wools' & the edges, there was little stitching. I had a thought in my head from when I did a 3D free motion embroidery course that would work rather well as a nest. I have used solvy film in another project too & understand that the threads have to overlap because that is all that hold it together once the water soluble film is washed away - an interesting challenge. 

I have 2 sewing machines set up in the spare room - my trusty 20 year old basic Toyota does not have drop feed dogs which is not ideal but the feed dogs are covered by a plastic plate for free motion (so the work can glide / be guided by hand only). I had to modify (sand) a wooden hoop so it would fit more easily under the free motion foot once attached & it works well (with red marker to show where to slide it in & out) 

I have experimented with various free motion feet & have a selection - some working easier than others. Last year a friend was selling her electronic Brother machine, the very model I had been looking it, so I bought it from her (she was upgrading to one that could do patterns for commercial work) & it is a dream for stitch choice & it does basic lettering too. 

However, the new machine, while the feed dogs drop easily, has a smaller working space & it is lower so there is less room to maneuverer an embroidery hoop by hand. However, having 2 machines, means that one can be set up with the right free motion feet & plate so that makes it quicker to try things. 

You can see the difference in the working space between the machines. 

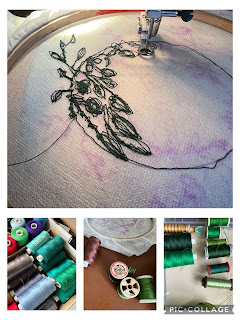
This morning, acting on my inspiration, I added some Solvy film to my hoop, traced the 4 inch circle on to it & drew in some details of ivy like vine leaves. I drew some leaves outside the circle, as well as at the bottom & the top with the idea of bending them over to hide the nest part of the sewing with an additional layer.  I should have used the frixion pen as this sewing one didn’t give neat lines but it was ok in the end. 

From the course i did, I remembered to select various shades of greens to give the work depth, threaded up the machine, then lost several hours to the immersive time of free motion embroidery. (Changing bobbins is easier on this one for free motion as the work can be kept in place while you do it) 

Bundling up some green silk threads from my late mother in laws stash that were too fragile to be sewn with, but were perfect for a nest. I pulled some off, put it between two layers of Solvy film then just ran a few machine threads over it to keep its shape. 

The stitches have to loop over each other, circular motion works well because it holds the threads together when the work is dipped in warm water & the water soluble film disappears completely. The threads give it structure but they can be manipulated in creative ways which is what I enjoy.

It is so easy to get lost in this process & once I got on to the second green thread, I could see my outline sketch was taking shape & it felt more ordered.  Several other thread changes & I decided it was done. 

Changing the cotton to blues, I decided to do the egg shapes suggested in the brief in machine embroidery. Because the section was so small, I doubled over the film & just held the edges between my hands to give it rigidity. It worked but it did snag a few times. 

The moment of truth - taking it all downstairs to the basin & draining board - will it hold its shape? Have I joined the sections enough & was my design appropriate for the sewing? 

The silk threads held in the simple outline, the blue threaded eggs kept their shape - the largest one to be dipped last ... 

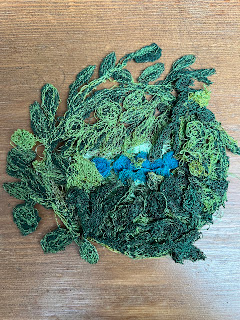
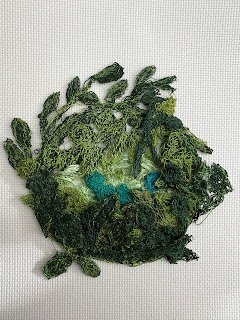
Phew, the film dissolved immediately leaving a very good outline of a hedgerow of leaves & a good circular shape. 

I lifted it out, it still felt sticky with the film, so I changed water & dipped it again, then placed it gently on a clean tea towel to dry. 

I pinned the nest shape to a piece of polystyrene (as we had done on our course) to hold its shape. This also made it easier to fold over the tendrils that I had made outside of the circle. I am rather pleased with how well they flipped over & on to the circular shape. I pinned them in place to dry. 


I love doing courses in new techniques because they give you confidence to return to them. This free motion shape has challenged me in the design but I am rather pleased I went with something quite different.  

Hmmm side leaves curled in or left out? What do you think? 

What to do now seen as I have already hemmed & edged the felt nest? Perhaps I will add it to the reverse of that panel  as the alternative or  perhaps I should add it to my 100 day sewing roll that is not making as much progress as it should ... 

What do you suggest? Give me some ideas please. Thank you for your company, inspire me with your projects. 

Dee ๐Ÿชก๐Ÿงต๐Ÿชก